
Sportswear Size And Measurement Guide.
How to take body and garment measurements correctly, how grading builds a size run, typical steps and tolerances, and a blank size chart worksheet to fill in.
Published — True Fit Sportswear Team
Size And Measurement Guide
Body and garment measuring diagrams, typical grading steps, typical tolerances, youth cautions and a blank, fillable size chart.
Download the PDFOpens and prints from any PDF reader. No email address needed.
Why Measuring Method Matters More Than The Chart
Two people can measure the same shirt and report chests two centimeters apart without either being careless. One held the tape slightly above the armhole, the other stretched the cuff, and a third included a seam allowance. A size chart is only as reliable as the method behind its numbers, so the first job is agreeing exactly how each point is taken. This guide gives you a method you can write into a brief and expect a factory to follow, and the PDF puts the same diagrams on paper so you can keep them next to the table while you measure.
For the wider story of fit types, size breakdowns and fit samples, read our sizing and grading guide. This page is the hands-on reference that sits beside it.
Taking Body Measurements
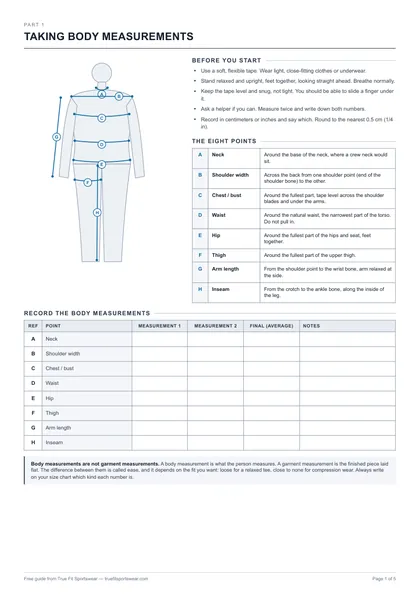
Use a soft, flexible tape and wear light, close-fitting clothing. Stand relaxed with your feet together, keep the tape level all the way round and snug enough that it does not slide, but loose enough to slip a finger under. Breathe normally, and take each measurement twice.
| Ref | Point | How to take it |
|---|---|---|
| A | Neck | Around the base of the neck |
| B | Shoulder width | Across the back, shoulder point to shoulder point |
| C | Chest or bust | Fullest part, tape level across the shoulder blades |
| D | Waist | Natural waist, narrowest part, without pulling in |
| E | Hip | Fullest part of the hips and seat |
| F | Thigh | Fullest part of the upper thigh |
| G | Arm length | Shoulder point to wrist bone, arm relaxed |
| H | Inseam | Crotch to ankle bone along the inside of the leg |
Taking Garment Measurements
Garment measurements describe the finished piece, laid flat on a hard table and smoothed without stretching. You measure straight across from edge to edge, so a flat chest width is half of the full circumference. The diagrams show the usual points for a top and for shorts or leggings.
Measure waistbands, cuffs and hems twice: once relaxed and once stretched to a stated amount. A leggings waist that reads 33 cm relaxed can read much wider when stretched, and both figures matter to the fit. Say which one you mean whenever you quote a number, and take garment measurements after a wash if you want to know how a piece behaves in real life.
Body Versus Garment: Understanding Ease
The gap between a body measurement and the garment measurement for the same point is called ease. A relaxed training tee carries generous ease through the chest. A compression top carries almost none, because it is meant to sit on the body under tension. Mixing the two kinds of number in a single chart is the most common cause of a chart that confuses customers. Choose one basis per chart, label it, and if you give customers body measurements while the factory works from garment measurements, keep a conversion table so nobody has to guess the ease.
How Grading Works, With Typical Steps
Once a base size is approved, grading adds or removes a fixed step at each point to create the other sizes. The step is different at different points: widths grow faster than lengths. The ranges below are typical for adult regular sizing, measured on flat garments, per full size step such as M to L. They are starting points for a conversation, not rules, and a stretch or close-fitting garment often grades by smaller garment steps for the same body step.
| Point of measure | Typical step | In inches |
|---|---|---|
| Chest or bust width (flat) | 2.0-3.0 cm | 3/4 - 1 1/4 in |
| Body length | 1.0-2.0 cm | 3/8 - 3/4 in |
| Shoulder width | 0.8-1.5 cm | 3/8 - 5/8 in |
| Sleeve length | 0.5-1.5 cm | 1/4 - 5/8 in |
| Waist or hip width (flat) | 2.0-3.0 cm | 3/4 - 1 1/4 in |
| Thigh | 1.0-1.8 cm | 3/8 - 3/4 in |
| Rise | 0.5-1.0 cm | 1/4 - 3/8 in |
| Inseam | 0.5-1.5 cm | 1/4 - 5/8 in |
Worked example, illustrative only. A base size M tee has a flat chest of 52.0 cm. With a 2.5 cm chest step, size S is 49.5 cm, XS is 47.0 cm, L is 54.5 cm and XL is 57.0 cm. If body length uses a 1.5 cm step from a base of 71.0 cm, the lengths run 68.0, 69.5, 71.0, 72.5 and 74.0 cm. These are sample numbers to show the arithmetic, not a size chart to copy.
Tolerance Guidance
No two finished garments are identical, so every measurement needs a tolerance: how far the finished piece may differ from spec and still pass. Typical figures for knit activewear are around plus or minus 1 cm (3/8 inch) on widths such as chest and waist, plus or minus 1 to 1.5 cm on body length, plus or minus 0.5 to 1 cm on shoulders, sleeves, rises and inseams, and plus or minus 0.5 cm on necks and openings. Tighter is not automatically better. Very tight tolerances on stretch fabric are hard to hold consistently. Agree the numbers before the first sample, write them beside the spec, and check the sample against them point by point. Our quality control page describes how orders are checked, and the tech pack template has a tolerance column for every point of measure.
Youth Versus Adult Cautions
Children are not small adults, and a youth size should never be an adult pattern shrunk by a percentage. Proportions between height, width, rise and sleeve length change quickly with age, so youth garments need their own base size and their own grading. Define each youth size by a height and chest range rather than only an age label, because age labels mean different things at different brands. Consider a little extra room in length and rise for growing wearers. Many markets also restrict drawcords near the neck on children's clothing and have special labeling rules, so check the requirements where you sell. Our youth versus adult sizing guide covers the order-quantity side, and our teamwear page shows the kinds of youth kits clubs commonly order.
Mistakes To Avoid
- Copying another brand's chart. Their fit, fabric and body model are not yours. Measure your own garment.
- Leaving out the unit. A bare "52" could be centimeters or half-inches. Write the unit on every page.
- Charting only chest and length. Neck, sleeve opening, rise and leg opening are where unhappy customers usually find a problem.
- Changing the chart after approval. If the chart changes, the sample no longer represents it, and you need another sample.
- Forgetting the fabric. A stretchier fabric wears smaller at identical measurements. Our fabric GSM chart helps you name the weight and type alongside the chart.
The Blank Size Chart Worksheet
The last page of the PDF is a blank, fillable size chart. It has header boxes for garment type, fit, age group, units and base size, then twenty-four rows with a point of measure, a grade, a tolerance and a column for every size from XXS to 3XL. Fill in the base size first, then the grade at each point, then the finished measurement in each size. Keep it with your tech pack so reorders match the original run. Samples have no minimum quantity and typically take 8–10 days, so you can test the chart against a real garment before committing to bulk, which starts at 20 pieces per style; see our samples page.
Cite Or Link To This Resource
You are welcome to link to this page from your own site, newsletter, course notes or team handbook. Linking to the page, rather than copying the file, means your readers always get the current version. Here is ready-made link markup:
Plain-text version: Sportswear size and measurement guide (free PDF), True Fit Sportswear, https://truefitsportswear.com/resources/size-and-measurement-guide